")

Tip No1: Invest in the right tool
Seriously, don't fret about spending a little more than you feel comfortable with on a great hair tool. Not only will it last you forever (hello, worthwhile investment), but using a higher quality tool with newer technology can help you to avoid some serious damage to your hair.
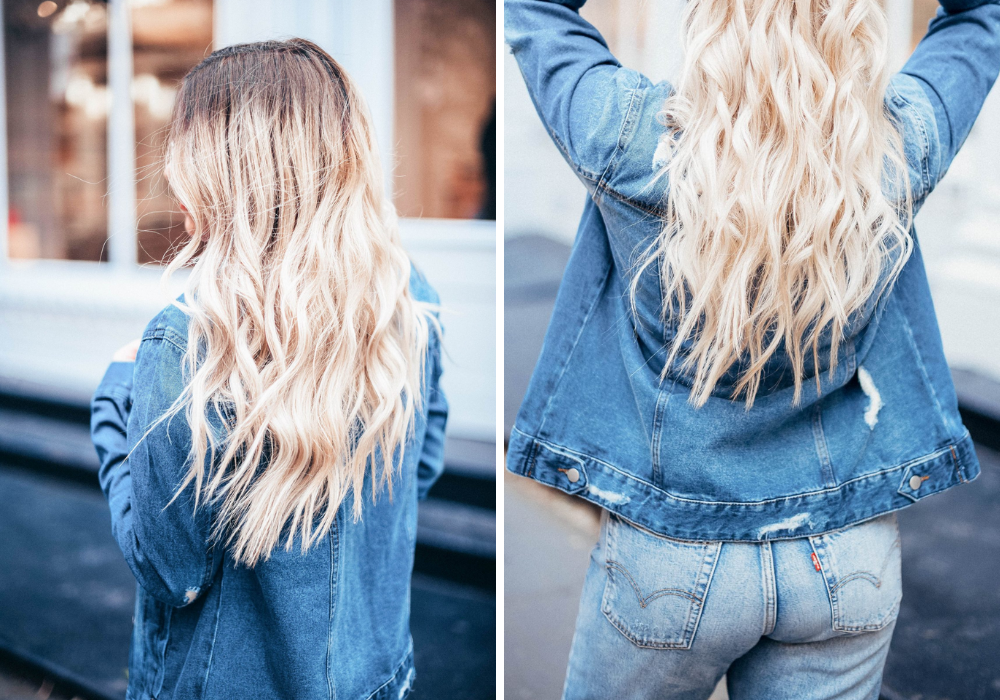
For many years, I used a clip-barrel curling iron, which gave me a rounded, bouncy curl. I loved the look of this style, but it didn't always wear well the next day. I would find myself having to re-curl my hair to get that freshly-curled, polished look again, and I wanted to switch it up to a lower-maintenance style, which led me to trying out a curling wand. It definitely felt weird at first switching from a clip barrel to a wand, but as soon as I got the hang of it, I was hooked.
The biggest difference in the style produced from a wand versus an iron is the natural, lived-in look. The wand creates a natural, flattened wave as opposed to a round, bouncy curl. So if you're looking for a low-maintenance, natural style, go for a wand.
Tip No2: Position makes perfect
Positioning technique can be tricky at first, but it's so important to nail it down to get the right look! You always want to hold your wand cord side up and elbow up, curling the side of your hair opposite than the hand you're holding your wand in.
Try it: Imagine your left pointer finger is your wand. Hold your hand out in front of you with your pointer finger out (as if making the #1). Turn your hand upside down, so that your elbow is sticking up, and reach your hand over to the right side of your head. This is how you'll curl your right side. This may feel awkward at first, but a) it will be much different when you're actually holding the tool in your hand and b) you'll get used to the technique. You'll repeat this same technique on the left side, but holding the wand in your right hand.
For those of you used to using a clip barrel and holding your iron cord side down, using a wand for the first time will be a bit of a learning curve. I hated the difference at first, but got used to it in like, a day.
Tip No3: Technique matters!
Everyone will tell you something different when it comes to technique for achieving the perfect beachy wave. The key is to take in all the advice you can, try it out, and see what works best for you!
I separate my hair into sections to curl it, but have seen plenty of people curl it in pieces with their hair completely down. Again, it all boils down to preference. I would recommend utilizing 3-4 sections depending on the thickness of your hair (I use 4). To section, start from the bottom, clipping the top up and separating what's down in half. Pull half forward over your right shoulder, and the other half forward over your left. Curl one side at a time, starting with the piece closest to the back of your head. As you complete each single curl, throw it back over your shoulder. This simply helps me to separate what's done from what still needs to be curled.
Once you've finished a section, swipe your curled hair over to the side as you let down your next section and repeat the process. Typing it out makes this process sound tedious, but once you get the hang of it, you'll be doing full sections in 2-3 minutes flat.
To complete an individual curl for all layers excluding the top, wrap your hair around the base of the wand starting from your root. Alternate curling away from your face and towards your face to help achieve that tousled look, leaving out about 1"-2" of hair at the end. Having straighter tips as opposed to curling them creates a more natural look.
When it's time to curl your top layer, you'll need to employ a slightly different technique (that sentence sounded to profesh). Instead of wrapping your hair around the base of the wand starting from your root, start your curl right around where your eyebrows fall, about 4" from your root. As you work your way towards the frame of your face, always curl away from it.
Tip No4: You're not done until you're done
Ya gotta commit to the beachy wave! You're not done when you put that curling wand down. After you finish your hair, it will most likely look piecey, and the goal of this style is to create a natural look while still maintaining texture. To achieve this, you'll want to give your hair a minute or two to cool down completely. Once its cooled, flip your hair over and tszuj your hair at the root (basically a fancy way of saying, lightly shake out your curls).
I usually follow this step by very lightly brushing out the top layer of my hair with a boar bristle brush. The goal of brushing out the top layer is to mesh together your curls without totally brushing them out.
Finish your waves off by adding a little texture with a sea salt spray. I love this one by Herbivore because not only does it smell ah-mazing, but it gives my hair the perfect texture without that sticky, salty feel.
If your hair is thin and you want to add some volume, add a little bit of volumizing powder to your root and lightly work it in with your fingers in a quick back and fourth motion. I don't typically do this on day 1 because of how thick my hair is, but it's a great second or third day trick to give your hair some extra oomph as the oils in your hair start to weigh it down.
Lastly, smooth out your frizz with a frizz wand at the root.
And there you have it - perfect beachy waves (Rome wasn't built in a day guys).

")
")


")


")

")


")


