")

6 Steps to the Perfect Tan
01. Shower, exfoliate and shave at least 12 hours prior to tanning
Setting up your body for self-tanner is a crucial step in achieving a flawless, smooth tan. You want to make sure that your body is properly exfoliated (especially if you're reapplying self tanner after it's sat on your skin for a few days) and that your legs are smooth.
It's important to abide by the 6-12 hour rule so the pores on your legs have a chance to fully close up. If you self-tan immediately after shaving, your skin can react to the ingredients in your self tanner, creating a similar rash to razor burn. Additionally, your self tanner can "cling" to your open pores, causing that strawberry legs-look. PS - If you suffer from razor burn or strawberry legs, try this shave cream.
Note: 6-12 hours is a general rule of thumb. If I'm in a rush I always wait a full hour minimum.
02. Only moisturize these areas
Moisturizer acts as a barrier between your skin and your self tanner, and will dilute the color of your tan. In order to prevent your self tanner from soaking in too much on the drier areas of your body, make sure to moisturize the following areas: hands with a focus on knuckles, inner wrists, elbows, knees and feet with a focus on heels.
Hands and feet are often the trickiest areas to perfect when it comes to self-tanner, and moisturizing them fully is a great self tanning tip for beginners to lessen the chances of streaking or mistakes.
Don't moisturize all at once! Most moisturizers dry fairly quickly, and if you apply your moisturizer to your entire body, by the time you've worked your way up to your top half, it will be too dry.
I tan in 5 quadrants and wait to apply moisturizer until right before I'm ready to do a single area: left leg, right leg, stomach/back, left arm, right arm

03. Dampen your tanning mitt
You've probably heard that the most effective way to self-tan is on completely dry skin; which is correct...with a caveat!
Yes, your skin should be dry prior to self-tanning, however, dampening your tanning mitt before applying your self tanner is a great self tanning tip for beginners especially to ensure an easy, smooth application.
The key here is to gently wet your mitt before wringing it out completely. Think of it similar to using a wet versus a dry beauty blender to put on your makeup. The dampened mitt is going a) prevent your self tanner from soaking right up into the mitt, and b) help your self tanner to glide on more easily, without settling into dry spots.
04. Don't skimp on product!
In the case of self tanning, less is not more. Too little product can cause streaks, so be sure to apply a generous amount to each section of your body.
As a general rule of thumb, I usually apply 2 pumps per bottom leg, 3-4 pumps per thigh, and 2-3 pumps per arm.
If you ever feel like you've picked up too much product, simply grab the excess with your mitt and rub it into a place on your body with a larger surface area like your stomach or your back.
05. Work in quick, circular motions
The best way to apply self tanner is quickly. Depending on the formula you are using, some self tanners will dry very quickly on your skin (another reason why a damp mitt comes in handy) and working in quick, circular motions will ensure the most even application.
To see a tutorial of how I apply my self tanner, visit my self tanning story highlight!
06. Minimize room for error with this finishing touch
Once you've finished self tanning, clean up any excess tanner or tricky spots by applying moisturizer to a towel and gently "buffing out" the area. I like to do this especially on my inner wrists, heels, and elbows. This is a great trick to dilute the self tanner enough that it won't streak, without completely removing it. This is one of my favorite self tanning tips for beginners!
My Top Recommendations
See my ratings and full review for each of these tanners in this post, plus my recommendations for the perfect face tan, and my go-to self-tan "supplements".
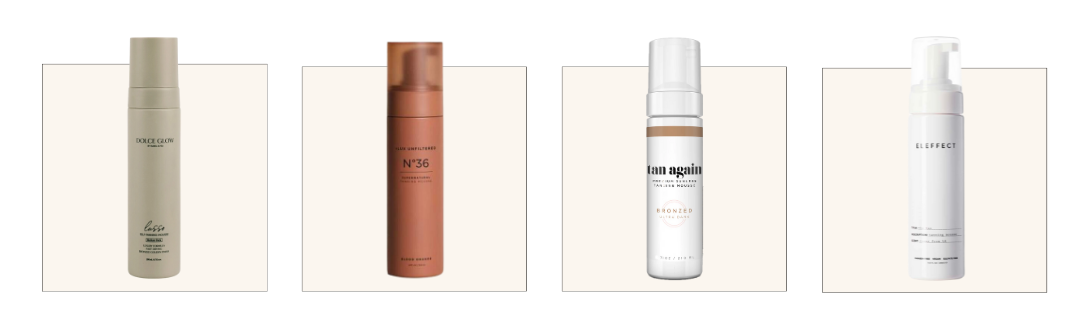
Dolce Glow (10% off with DANIELLE) / +Lux Unfiltered / Tan Again (15% off with DANIELLE)/ Elle Effect
Tip: I love using a dense brush for areas like hands, feet and especially face! Code DANIELLE for 15% off this one by Tarte.
Quick Tips
+ If you are fair-skinned, look for a self-tanner with a green undertone. It will be less likely to develop with an orange-y tone.
+ If you are tanning at night, buy a separate black sheet set and sleep with the topsheet and the pillow case to avoid having to replace your sheets entirely. Simply throw the black sheets in the wash the next day.
+ Clean your tanning mitt after every use to avoid your next tan applying splotchy. Just a simple rinse with soap and warm water. I position my mitt over my faucet handle to try over night.
+ If you don't have anyone around to get the hard-to-reach spots on your back, try turning your mitt around so that you're applying with the back of your hand vs. your palm.
+ You can also purchase a mister bottle and fill it with a small amount of your liquid tanner for easy application on your upper back area.
+ A foam or a mousse is easiest to apply, and what I recommend most for beginners especially.
+ Keeping your skin moisturized post-tanning will help to lock in and prolong your tan.
+ When washing off your self-tan the next day, use mild soap and water and avoid any exfoliators or loofahs to keep your color intact.
+ Stand in front of a mirror when applying your tan and check easy-to-miss areas like behind your knees and the outside of your forearms before clothing.

")
")


")


")

")


")


