")
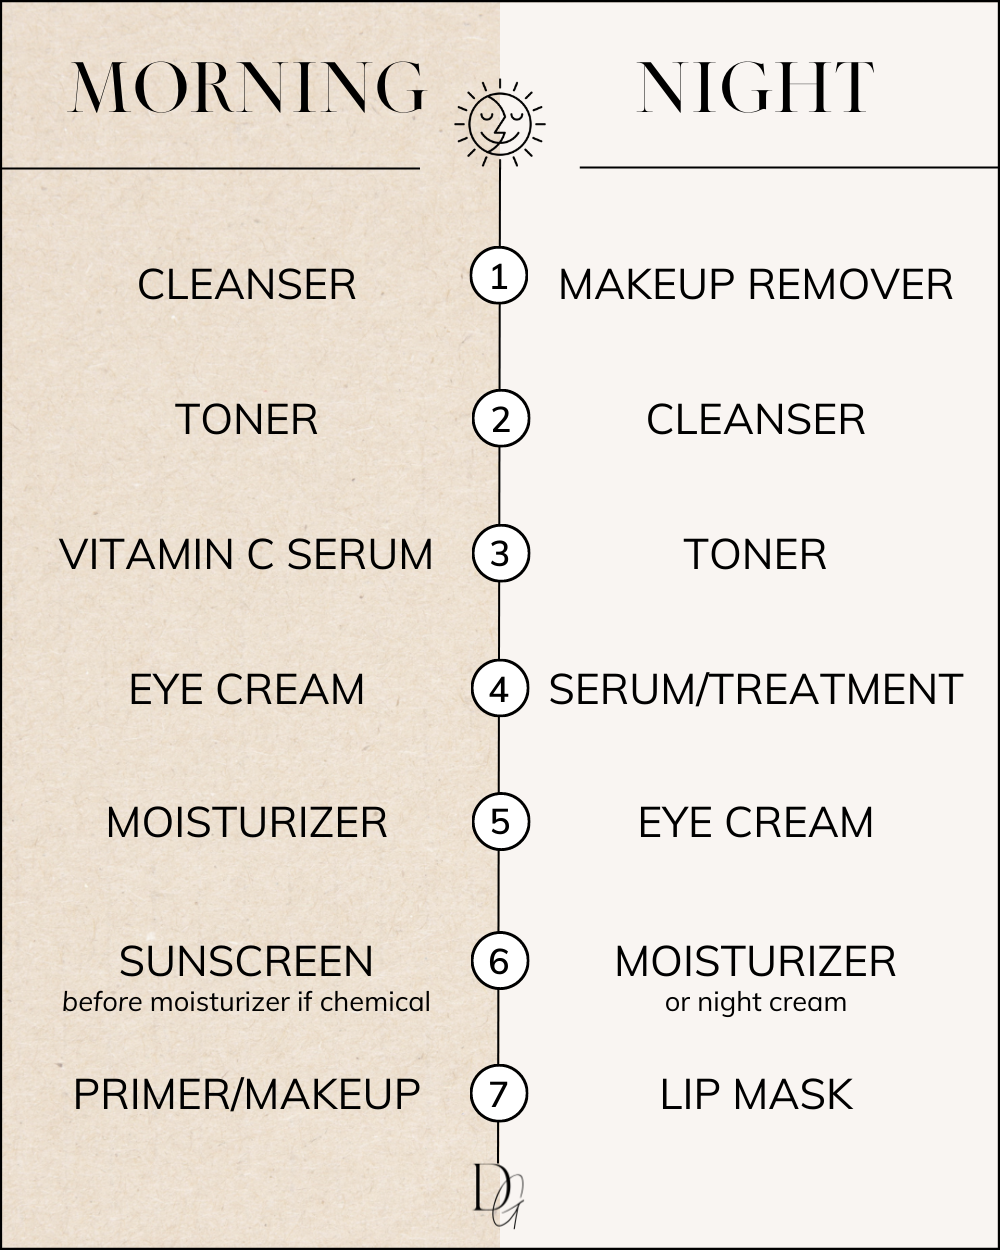
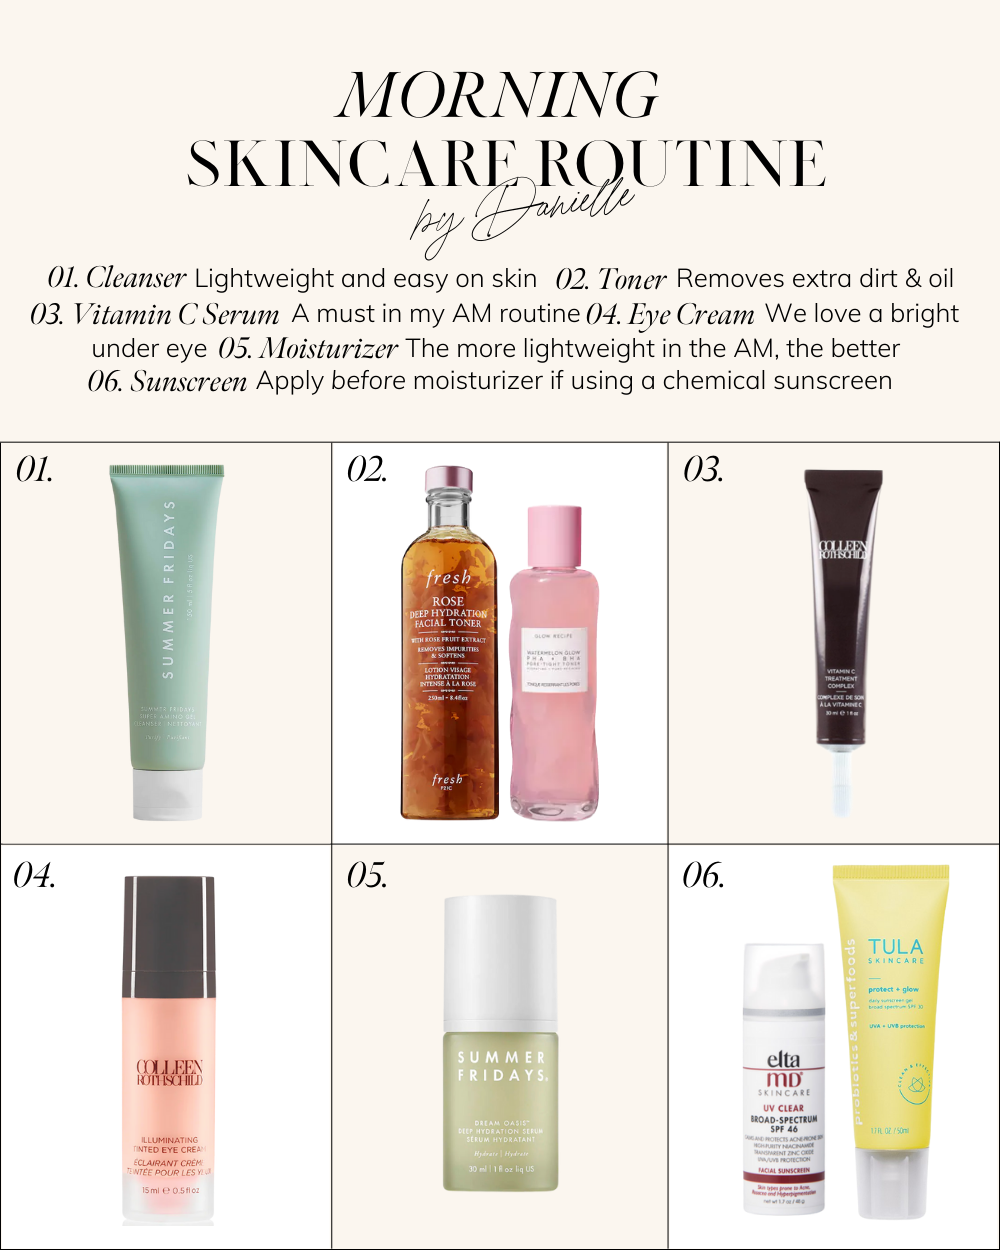
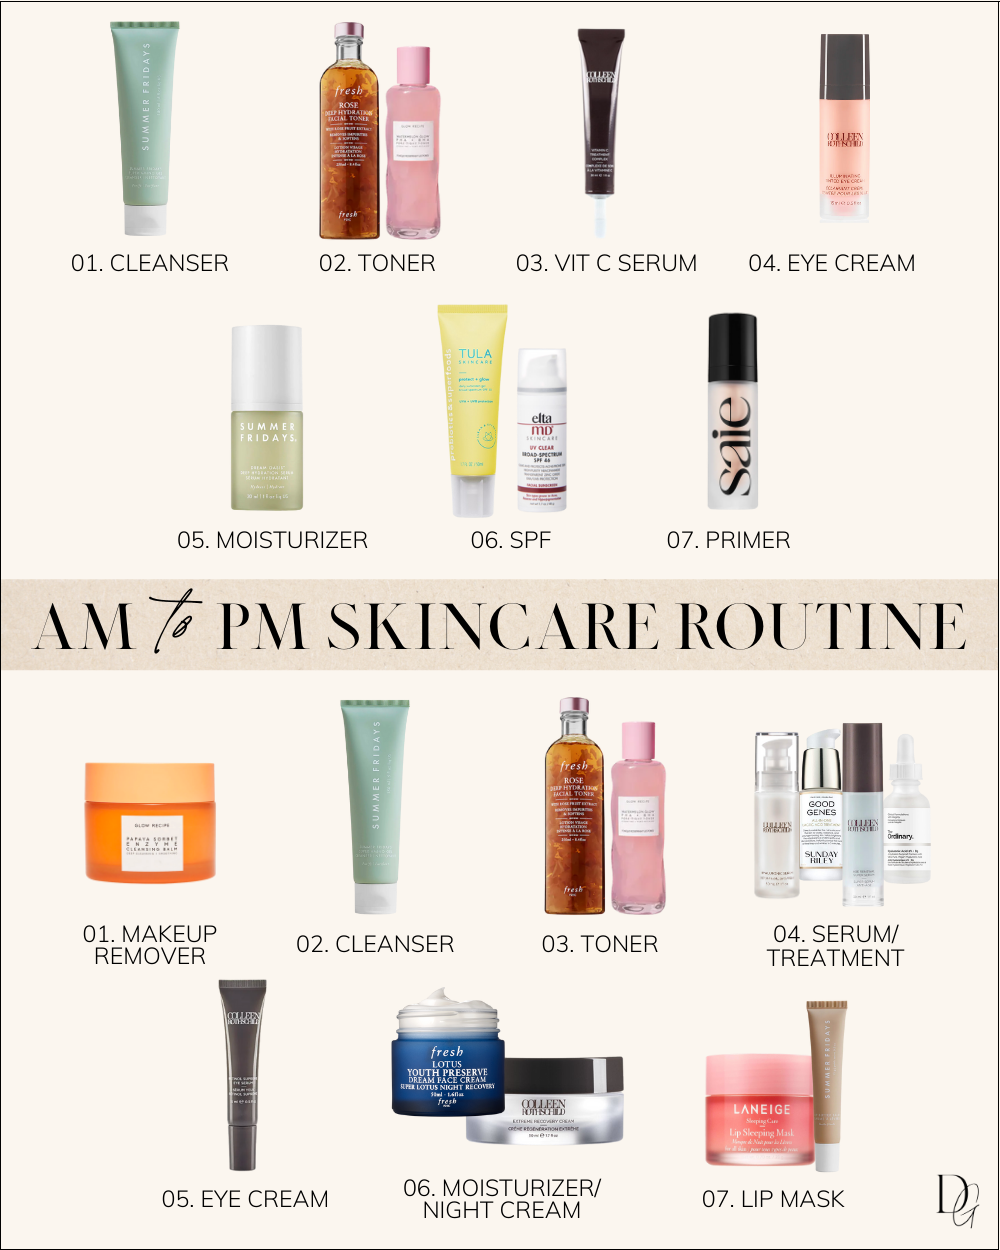
Step 1: Cleanser
I like to keep it simple and clean when it comes to cleansers, and never like anything with too much fragrance. This Summer Fridays Super Amino Gel Cleanser is my current go-to.
Step 2: Toner
I previously strayed away from toner because I had used a handful of really drying toners in the past. Toners have come such a long way though, and help balance your skin's pH while acting as a delivery system for serums. I used Fresh's Rose Deep Hydration Toner for years which smells amazing (it has actual fresh rose petals in it), keeps my skin nice and hydrated, and gets that excess dirt and oil off.
I also fell in love with Glow Recipe's Watermelon Glow Pore Tight Toner (smells like a watermelon margarita) which is great for hydrating and minimizing the appearance of pores. I use this most days now, and apply with these washable/reusable facial pads.
Step 3: Serum
Rewind to 5+ years ago, I was definitely not using any type of serum. What I've come to love about serums, however, is that you get to pick your (what's the opposite of poison?), depending on your skin's needs. Think of serums as super-concentrated, nutrient-dense treatments for your skin.
As a rule of thumb, stick to a Vitamin C (L-Ascorbic Acid)-based serum in the AM. These types of serums help prevent damage from free radicals (complicated AF atoms that cause damage to skin cells) that occur throughout the day. I currently use Colleen Rothschild's Vitamin C Serum every morning (give it a minute to absorb before your next step!).
Rule of thumb: use any serums containing keywords "antioxidant" in the AM and those containing keywords "anti-aging" in the PM.
Use code DG20 for 20% off all Colleen Rothschild products!
Step 4: Eye Cream
When it comes to eye cream, consistency is key. Regular use helps keep the skin around your eyes elastic, which can help prolong those fine lines or collagen loss. My key concerns are dark circles and fine lines, and Colleen Rothschild's Illuminating Tinted Eye Cream targets just that. It's packed with hyaluronic acid, caffeine and peptides which is the perfect recipe for radiant skin. If you prefer to use a Retinol-based eye cream or one containing Vitamin C, try Colleen Rothschild's Retinol Supreme Eye Serum.
Step 5: Moisturizer
Although technically a serum by name, Summer Fridays Dream Oasis Serum applies like moisturizer. I love this in the AM especially because of how lightweight it is.
Step 6: Sunscreen*
If I've learned one thing about skincare in my 30's, it's the importance of an SPF daily. This is important: your sunscreen may or may not come before your moisturizer depending on if it's a chemical sunscreen or a physical sunscreen (read more about which is better for your skin type in this post).
Chemical sunscreens are absorbed into the skin, which then absorb UV rays, convert them into heat and release them from the body. Physical sunscreens, on the other hand, sit on top of your skin and reflect UV rays.
If you're using a chemical sunscreen, apply it before your moisturizer so it's able to penetrate the skin and do its job. If you apply it after moisturizer, it will hinder that absorption.
If you're using a physical sunscreen, apply it after your moisturizer so there's nothing sitting on top of it and blocking it from doing its job. If you apply it before moisturizer, you'll be creating a layer between sunscreen and UV rays.
Hands down the highest recommended face sunscreen (physical) is Elta MD's Broad-Spectrum SPF 46. Tula's Protect + Glow Sunscreen (chemical) is another fantastic option that will give you a nice glow without clogging pores.
Bonus Step: Neck Cream
You may have never heard of "tech neck" wrinkles, but you most likely have them! Tech neck wrinkles are the lines that form across your neck thanks to all of the time we spend looking down at our phones and laptops. Mine have always been an area I've been self conscious about. I started using ItCosmetics' Confidence in a Neck Cream regularly morning and night to finish off my skincare routine and have seen such a difference in how deep set my lines are.

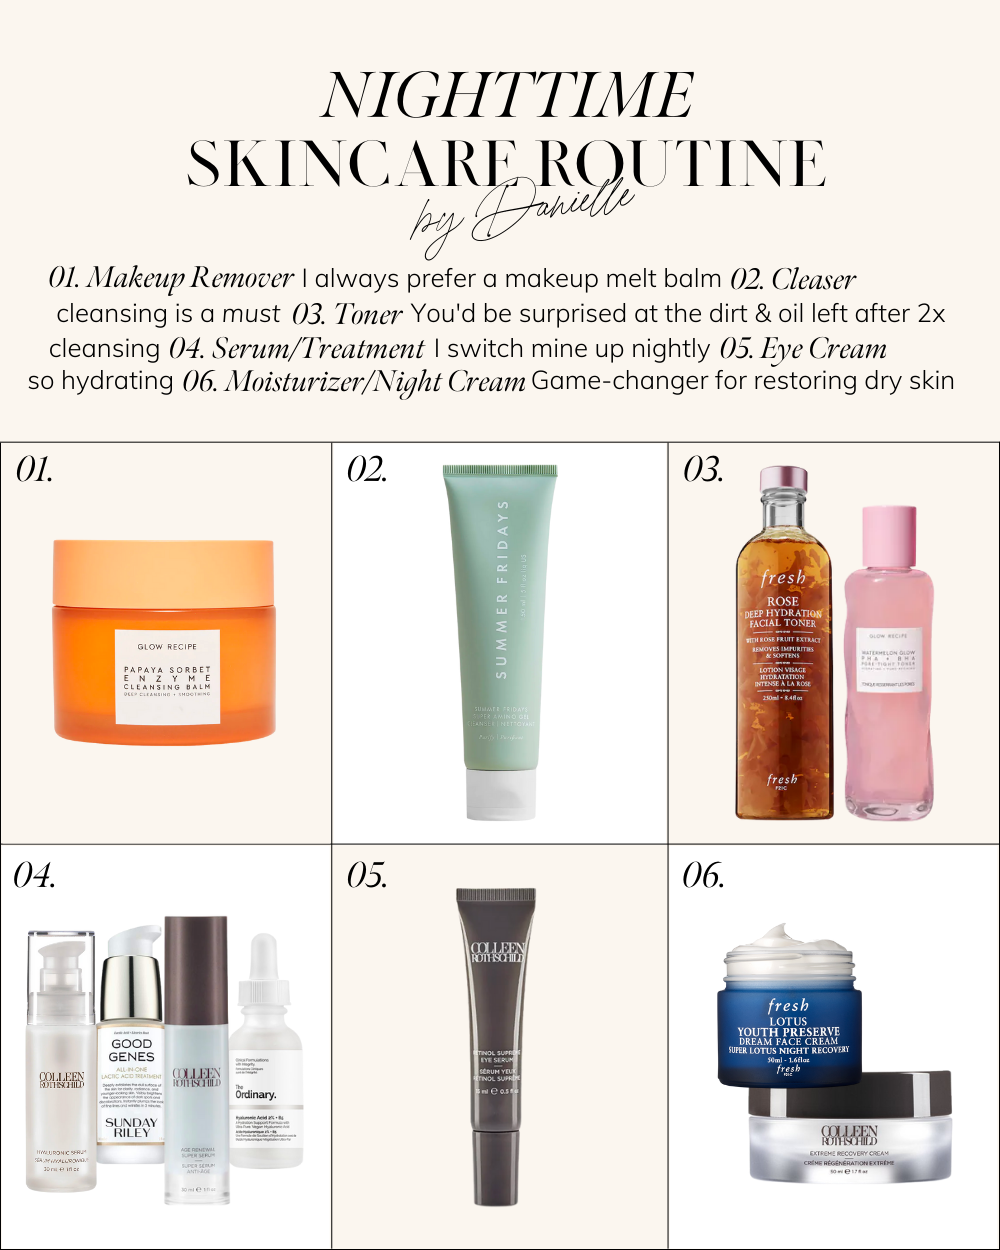
Step 1: Makeup Remover
Cleansing at night should be a two step process. First, I remove my makeup with a cleansing balm which helps to dissolve it, along with any surface build up from the day. I skeptically decided to try out a 'makeup melt' balm for the first time, and haven't looked back since. I was worried about a balm leaving an oily residue on my skin, but Glow Recipe's Papaya Sorbet Enzyme Cleansing Balm has been such a game-changer (hack: you can also use it as your Gua Sha oil while removing your makeup to cut down time!). It goes on like oil, and magically transforms as water hits it, leaving no residue behind.
Step 2: Cleanser
Second, I cleanse all of the excess dirt, oil and leftover makeup that's loosened up and left behind after the first cleanse with Summer Fridays Super Amino Gel Cleanser.
Step 3: Toner
I use the same toner for AM & PM; Fresh's Rose Deep Hydration Toner or Glow Recipe's Watermelon Glow Pore Tight Toner. I always feel like toner is that extra step that gets the last bit of dirt/makeup off (yes, even after a double cleanse!).
Step 4: Serum/Treatment
Nighttime means business; time to break out your heavy-hitters. Your body does the bulk of its restoring overnight, so this is where you really want to utilize your targeted products based on your skincare needs. Think retinol, exfoliating treatments (glycolic acid, AHA/BHA pads) or hydrating serums. The goal here is to switch it up. For example, I use Good Genes Lactic Acid by Sunday Riley 2-3 times per week. On off days, I'm typically using a hydrating serum with hyaluronic acid (draws moisture into the skin, plumps + hydrates).
Also try: Glow Recipe's Watermelon Glow Niacinamide Dew Drops, Colleen Rothschild's Age Renewal Super Serum or her Glycolic Acid Peel Pads with Blue Agave (code DG20 for 20% off)
Step 5: Eye Cream
I like a bit of a heavier eye cream at night so it can really soak in. Love how easy this Retinol Supreme Eye Serum is to apply. Have also heard great things about BeautyCounter's Ultra Renewal eye cream and Glow Recipe's Avocado Melt Retinol Eye Mask.
Step 6: Moisturizer/Night Cream
Some people prefer to use a more restorative moisturizer at night (aka a night cream). I keep a few moisturizers on deck that I really enjoy and usually switch between Colleen Rothschild's Extreme Recovery Cream (this product changed my skin in the Winter!) and Fresh's Lotus Youth Preserve Night Cream. When I'm feeling like my skin has plenty of hydration, I'll skip this step and use Summer Fridays Dream Oasis Serum as a lightweight moisturizer instead.
Step 7: Facial Oil
On nights when I'm using a treatment like lactic or glycolic acid that tends to dry out skin, I'll add in a facial oil. This definitely isn't an every-night step for me, but when I do use an oil, I always reach for Colleen Rothschild's Retinol Supreme Night Oil (DG20 for 20% off).
To note: I have normal/dry skin, and I've always been fine with using a facial oil as a last step to my skincare routine.
Bonus Step: Lip Mask
I usually keep a lip mask by my bed and use it most nights that I remember to! Laniege's cult favorite Lip Sleeping Mask works wonders - and overnight! Just be careful to only apply on lips, as it can cause clogged pores if it sits on your skin. A few other favorites are Mario Badescu's Rose Lip Balm and Summer Fridays Lip Butter Balm.
What about acne spot treatments?
Every so often, when you need an acne spot treatment, it's important to apply it as close to the skin as possible in order for it to do its job. As a rule of thumb, apply under moisturizer. Personally, when I'm using a spot treatment like a drying lotion or acne patch, I avoid applying any skincare products directly on top of them.
I hope this post was a helpful read! I often get questions about skincare and my number one piece of advice is to experiment until you find what works for your skin type. Some of the products I love may not do a thing for you and vice versa, all due to skin being so vastly different! That being said, I hope you're encouraged to try out some of these recommendations that you may have heard about that have my seal of approval.Remember, you can print out my order of application chart to keep handy for your AM & PM routine!
Reminder that you can print out my order of application chart to keep handy for your AM & PM routine!
*DISCLAIMER: My skincare products, tools and recommendations are based on my own personal research and experience. Please always consult with your dermatologist before trying out new products and/or tools to see if they're right for your skin type!
Keep reading about my favorite skincare tools!

")
")


")


")

")


")


